Domain Name

Get your own domain name


It is best to get your own domain name, which you can then create different subdomains and allow easier access to your clinic and servers.

Choose a domain register and search for a domain name that is not taken and purchase it.

Options:

Tips:

  • Choose a short domain name, the shorter, the better
  • Select and pay for WHOIS Privacy option (this will hide your address and contact information)
  • .CA domains come automatically with domain register privacy (purchase as an individual)

Editing your DNS records

Log in to your domain registrar and click on the section "DNS Records" for yourdomain.ca

You can now create subdomains for your domain!

A Records

A Records tell computers what IP address corresponds to a domain name or subdomain.

This creates a subdomain so accessing www.yourdomain.ca will now direct people to your desired yourfixedipaddress:

  • DNS record type:           A
  • Subdomain name:         www
  • Value:                             yourfixedipaddress        (ie. 82.394.290.37 for your website server)

This creates a subdomain so accessing net.yourdomain.ca will now direct people to your desired yourfixedipaddress, ie. your clinic static IP location:

  • DNS record type:           A
  • Subdomain name:         net
  • Value:                             yourfixedipaddress        (ie. 73.394.290.30 for you clinic static IP)

Create an A record for Jitsi Meet "meet.youdomain.ca":

  • DNS record type:           A
  • Subdomain name:         meet
  • Value:                             yourfixedipaddress        (ie. 73.394.290.30 for you clinic static IP)
CNAME Records

CNAME records act like an alias for another internet domain.

  • DNS record type:        CNAME
  • Subdomain name:        website
  • Value:                            www.yourdomain.ca

This creates a subdomain so that accessing website.yourdomain.ca will now redirect people to www.yourdomain.ca.

URL Redirect Record

URL Redirects allow you to redirect a subdomain to another URL (including port numbers)

  • DNS record type:        URL Redirect Record
  • Subdomain  name:        emr
  • Value:                            https://net.yourdomain.ca:8443/oscar

* Assumes that you have already created an A record for subdomain "net".

This allows you to create a simple website address to access your clinic self-hosted OSCAR (on port 8443).


Install OpenSSH Server

Secure encrypted access to server console

If you did not install OpenSSH originally during the Ubuntu server installation with Tasksel, then install and configure it with these instructions:

$ sudo apt-get update

$ sudo apt-get install openssh-server

$ sudo systemctl enable ssh

Edit the configuration file:

$ sudo nano /etc/ssh/sshd_config

Modify the settings with the following:

PermitRootLogin prohibit-password

MaxAuthTries 10

PasswordAuthentication yes            (choose no if you plan on using SSH key only for SSH login)

Press Ctrl-O to save, Ctrl-X to exit.

Configure Uncomplicated Firewall to allow OpenSSH access:

$ sudo ufw allow in OpenSSH

$ sudo ufw allow in 22/tcp


Ubuntu LTS Bare Metal Server

Basic Linux server installation on server hardware

For many self-hosted server setups, you need to start with a basic Linux server, such as Ubuntu LTS. Follow these instructions on setting up a basic bare bones server.

Step 1: Download Ubuntu Server LTS (Long Term Server)

Go to Canonical's Ubuntu website and download the latest ISO image.

Burn the ISO to a DVD or make a bootable USB stick with a utility like BalenaEtcher.

Step 2: Enable Virtualization hardware in the BIOS of the server.

If you bought a CPU with VT-x or AMD-V, then you can run virtual servers on one machine. Determine the key to press in order to enter the BIOS screen for the motherboard by Googling the manufacturer name and "BIOS". Turn on the computer and press the key to enter the BIOS (usually Esc or one of the Function keys). Find the option that says "Intel VT-x" or" Intel Virtualization Technology" or "AMD-V" or "Virtualization Extensions" and enable it. This option may be under a submenu under Processor, or Chipset, or Advanced CPU Configuration or Northbridge. One you have enabled the option, "Save the settings to CMOS and Exit the BIOS".

Step 3: Install the server with the Ubuntu DVD or bootable USB stick.

You may need to enter the BIOS again and enable the "Boot Order" so the server computer can boot with the DVD drive or a USB. Otherwise, the BIOS may only allow booting from the hard drives (security feature). You can disable this after you finish installing the server.

There are many great online tutorials on how to install Ubuntu Server. Follow these tutorials and customize your installation with the following considerations:

Customization Considerations:

  • Install the baremetal hypervisor server on to a separate SSD (you can hardware RAID that if you are extra careful) that is different than your main RAID hard drives that will store your virtual machines and other files. This way, if you need to replace the much used hard drives, you don't need to to reinstall the bare metal server.
  • Partition your installation with separate root, boot, mount, and swap partitions:
    • /boot =  1 GB (ext4 file system)
    • swap = 2 GB (if you have lots of RAM, you don't need much swapfile space)
    • /mnt = 100 MB (ext4 file system) * This prevents backup scripts from filling up the root partition if copying to improperly mounted network drives
    • / = leftover space on the disk (ext4 file system)
  • If you use whole disk encryption at this stage, you run the risk of needing to physically present to manually typing in your root password everytime the server restarts or reboots after a power outage.
  • If you encrypt the "Home" directory, you run the risk of some things stored in your "Home" directory not running until you log in as the user. So don't store scripts or virtual machine images in your Home directory if you choose to encrypt.
  • Allow Ubuntu to "install important security updates automatically".
  • If you have the option of runing tasksel during the installation phase, consider installing these at this point (if not, we will show you how later):
    • Virtual Machines KVM
    • OpenSSH server

Various Tutorials and Resources on installing Ubuntu Server

Canonical

LinuxTechi

FossLinux

Step 4: Perform some initial housekeeping items

Once the server is installed, you can remove the installation media and boot in to the server. Using the administrator username and password you created when you installed the server, log in to the server.

Update and upgrade the server:

$ sudo apt-get update && apt-get upgrade


Allow the server to automatically remove unused dependencies (to keep the /boot from filling up). Edit the config file with nano:

$ sudo nano /etc/apt/apt.conf.d/50unattended-upgrades

Find the line that looks like the following and remove the "//" characters in the beginning of the line (uncomment), and change the parameter to "true":

Unattended-Upgrade::Remove-Unused-Dependencies "true";

Press Ctrl-O to save, Ctrl-X to exit.

Lower the wait time "Raising networking interfaces...." when booting the server, in case you have multiple network interfaces and not all are connected to a network with DHCP:

$ sudo nano /etc/dhcp/dhclient.conf

Edit the timeout to be 15 seconds:

timeout 15;


XFCE

Install a lightweight graphical user interface

Sometimes, navigating and operating a server with command line only is difficult. If you prefer a graphical user interface (and you installed the Ubuntu Server edition, and not the Desktop edition) you can install the lightweight GUI XFCE desktop.

$ sudo apt-get update

$ sudo apt-get install xfce4

Whenever you want to start the GUI, type the command:

$ startx

Now you can use the graphical desktop to load a Terminal window and continue working on your installations.


Installing a Virtual Machine

How to install a Linux KVM virtual machine for a server application


Prerequisites:

You have prepared your clinic for self-hosting a Local Server.

Read: Hypervisor Host Server if you have not completed the following Prerequisites:

  • You have a server installed with Linux KVM.
  • You are using Virtual Machine Manager (virt-manager) to create and manage your Virtual Machines (you can also use command line, but its a lot harder)
  • You have bridge networking enabled on your server
  • You have downloaded the ISO file for Linux - Ubuntu Server and copied to your host server.
Step 1: Manage your Hypervisor Server

If you followed the previous instructions on setting up a baremetal hypervisor server with Linux KVM, you can now start to access your host server and create guest Virtual Machines (VM) of which OSCAR can be one of them.

You have different options on accessing your host server:

Option A: Directly on the server

If you have a monitor, keyboard and mouse directly attached to the server, you can log in to the server by typing in your username and password.

Then enter the XFCE graphical user interface:

$ startx


Start the Virtual Machine Manager by accessing it in the Menu -> System Tools -> Virtual Machine Manager

or by starting a terminal session and typing:

$ virt-manager &


Option B: SSH to your server

SSH is a protocol of securely accessing the server through an encrypted channel. It allows you to connect to the server from another computer or location.

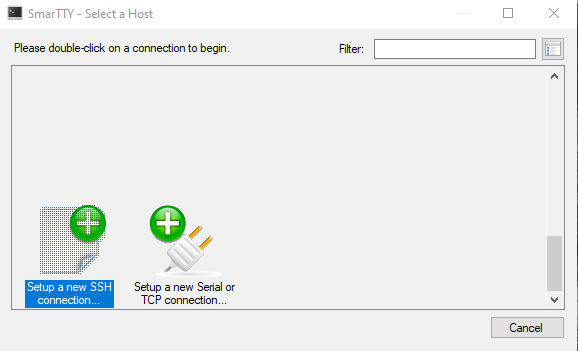
Use your favourite SSH program and ssh to the server IP. You can consider downloading and use SmarTTY.

Run the program and click on "Setup a new SSH Connection..."
Create a new connection profile:
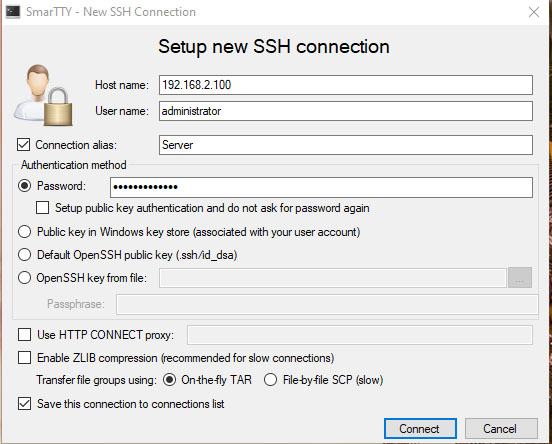
 

Change the IP Host Name, and server User name for what applies to your situation.Click "Connect" You should be connected to your server now. You can run Linux command lines or start the Virtual Machine Manager:

$ virt-manager &

Note: The "&" backgrounds the command (it runs the command in the background and lets your continue to work at the command line)

Copy the latest Ubuntu Server ISO to the host server

Download the latest Linux Ubuntu Server and copy it to your host server home directory ~/ such as "/home/administrator".

If you are using SmarTTY, you can go to menu "SCP -> Upload a file".

Upload a File with SCP

Local file name: find the ISO file that you downloaded own your computer

Remote directory: /home/administrator        (* Or whatever your administrator username is)


Click Upload.

* If you run in to problems and get error messages, it means you are trying to upload to a directory that your username does not have permissions to access. Please check that you are uploading to your home directory.

Step 2: Create a virtual disk

Once you have Virtual Machine Manager running, start by creating a virtual disk which you will install Linux server and then OSCAR.

Edit menu -> Connection Details -> Storage tab

Click on "New Volume".

Name the virtual disk file whatever you want "oscar-server.img".

Choose Format: qcow2

Max Capacity: 50 GB (or any size you want)

Allocation: 50 GB

Click "Finish"

Step 3: Create a virtual machine

Inside Virtual Machine Manager, click on the icon "New".

Give a name to your virtual machine, ie. "OSCAR"

Choose "Local install media (ISO image or CDROM)".

Click Forward.

Choose "Use ISO image" and browse to find the ISO image of Linux Ubuntu Server.

Choose OS Type "Linux" (Find the closest version that matches, otherwise choose the highest Ubuntu version shown)

Click Forward.

Enter an amount of Memory: 2000 MB (or more if you like)

Enter how many CPU you want to assign to this VM: 2

Click Forward.

Select "Select managed or other existing storage", click Browse and select your previously created virtual disk "oscar-server.img", click "Choose Volume"

Click Forward.

You may adjust the setting before booting up the virtual machine by checkmark enable "Customize configuration before install".

Click the "Advanced Options" arrow to thos the ethernet device to use. Choose the bridge network that you created previously, or use "Specify shared device name" and type in the name of the bridge network that you created previously, ie. Bridge name: br0

* Write down the MAC address of this virtual network interface. You should create a fixed IP address attached to this MAC address on your router, so you can know where to access your OSCAR server later.

Click Finish.

If you entered "Customize configuration before install" you can make some final changes and then click the icon 'Install".

The virtual machine server should show a window and start the Linux Ubuntu install process. Go through he same process (as explained in a previous post on installing Linux) and install a basic Linux server.

Some considerations when installing this Linux server for OSCAR:

  • Consider using full disk encryption using LVM-LUKS. This protects your OSCAR virtual disk data in case someone steals the server.
  • However, if you choose to encrypt the whole disk, you will need to be able to access the server console directly (or via SSH and the graphical Xming server) to type in the administrator password before you can boot up the OSCAR server. This may be an issue, if you experience power outages and the server restarts. Or if you shut down the server on purpose for maintenance, you will need to remember to check if OSCAR virtual machine is running and if the administrator password was typed in to continue the boot up sequence.
  • It will also be complicated if you run out of space and you want to expand the qcow2 disk that holds the encrypted LVM-LUKS system. If you used just a simple qcow2 disk, it is easier to expand the virtual disk, if you run out of space.
Step 4: Install your other server applications

Now that you have installed a bare Linux server with Ubuntu server in a virtual machine.

You can continue to install other packages on this bare Linux server, such as a web server (LAMP), Jitsi Meet, Nextcloud, Hylafax - Avantfax etc.


Done

Start using your self-hosted OSCAR electronic medical record system!